How To Make 4 X 4 Pumpkins

With a new (to us) home and projects galore, I wanted to have something festive for fall but I also wanted it to be inexpensive. I remembered seeing pumpkins made from 4 x 4’s and was ready to take on the challenge of learning How To Make 4 X 4 Pumpkins!
This project was created using little bits of time here and there. We had a table set up in the garage for cutting, sanding, and painting. Once the stem was attached, I moved the pumpkins indoors, to the kitchen island, where I could chat with my husband while creating!
4 x 4 Pumpkin Supplies
We had most of these supplies on hand. If you have to purchase a miter saw, this will no longer be a thrifty project. Fun but not thrifty. However, I’ve learned that my miter saw comes in quite handy and have created quite a few things using it including these 4×4 Wood Crafts.
This post contains affiliate links. When you purchase through an affiliate link, we receive a small commission at no additional cost to you. Disclosure.
- 4 x 4 fence post
- Miter Saw
- Sander or Sanding Block
- Exterior Orange Paint
- Sticks or Rope for stems
- Jute
- Green Wire
- Fall Ribbon
- Glue Gun
How To Make 4X4 Pumpkins
Transform a simple 4×4 wood post into fall pumpkins with this DIY project! Start by cutting the wood into your desired pumpkin sizes, then paint them orange. Add a rustic touch with a wooden stem and wrap it with jute for texture. For an extra pop of fall flair, twist some curly green wire around the stem to mimic pumpkin vines and finish off with a festive ribbon. These handmade pumpkins are perfect for adding a cozy, seasonal vibe to your home or porch!
If you’d rather make pumpkins out of material, check out how to make sweater pumpkins.
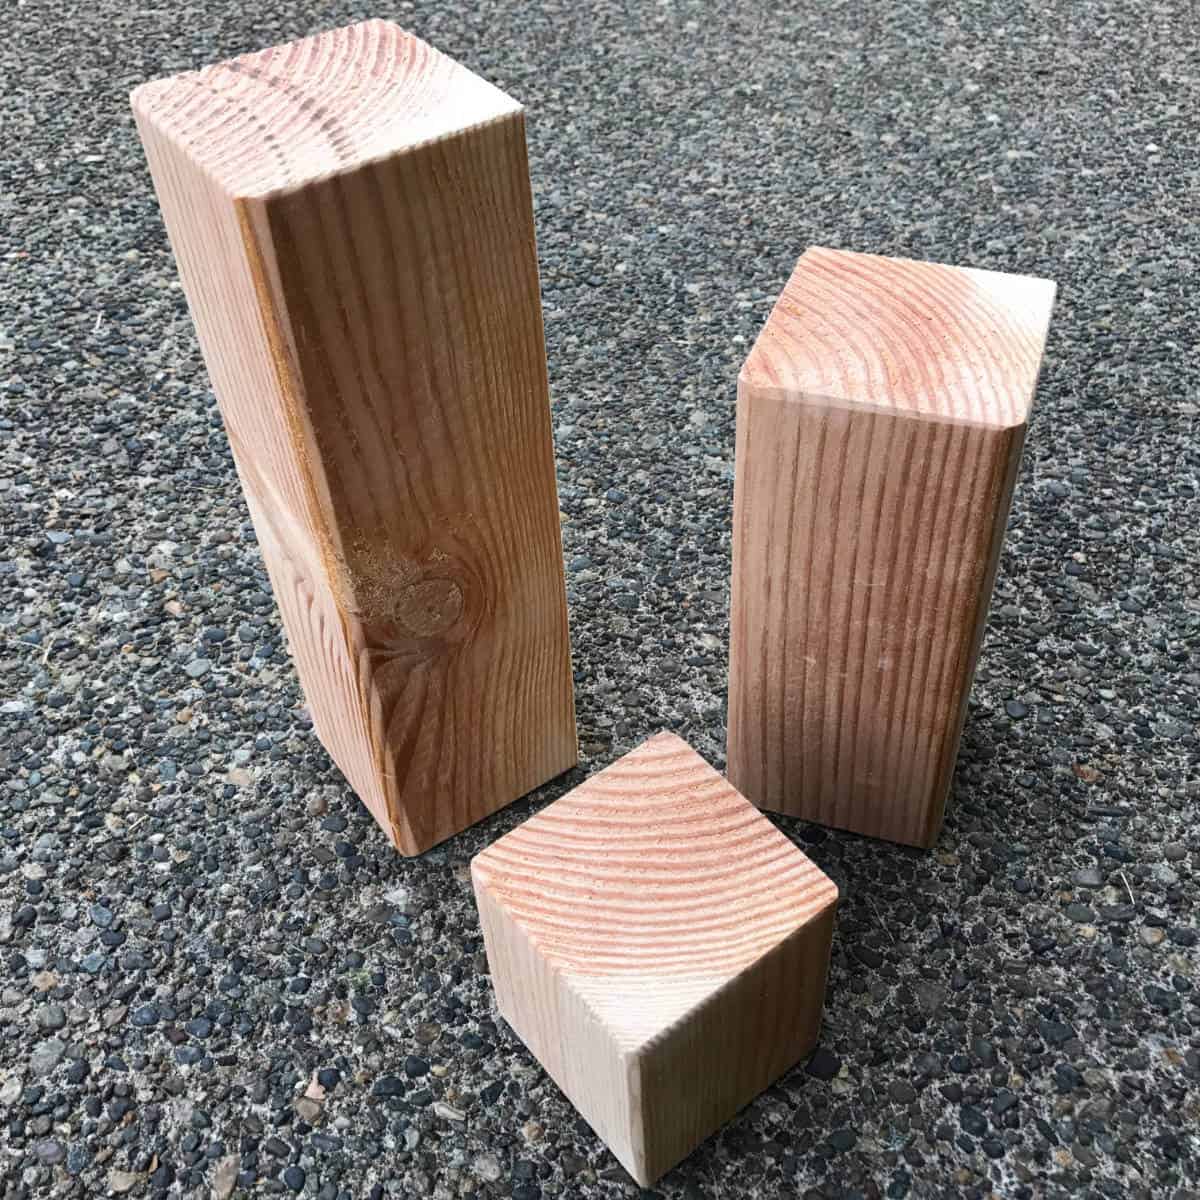
Step 1: Cut three blocks in graduated heights.
Use a miter saw to cut three different lengths from a 4 x 4. The smallest is a square and the other two are steps up from that. No need to measure. Just cut them to lengths that feel right to you!
Step 2: Sand your blocks.
Do a quick sand with a sander or sanding block. I like to soften the edges a bit, too.
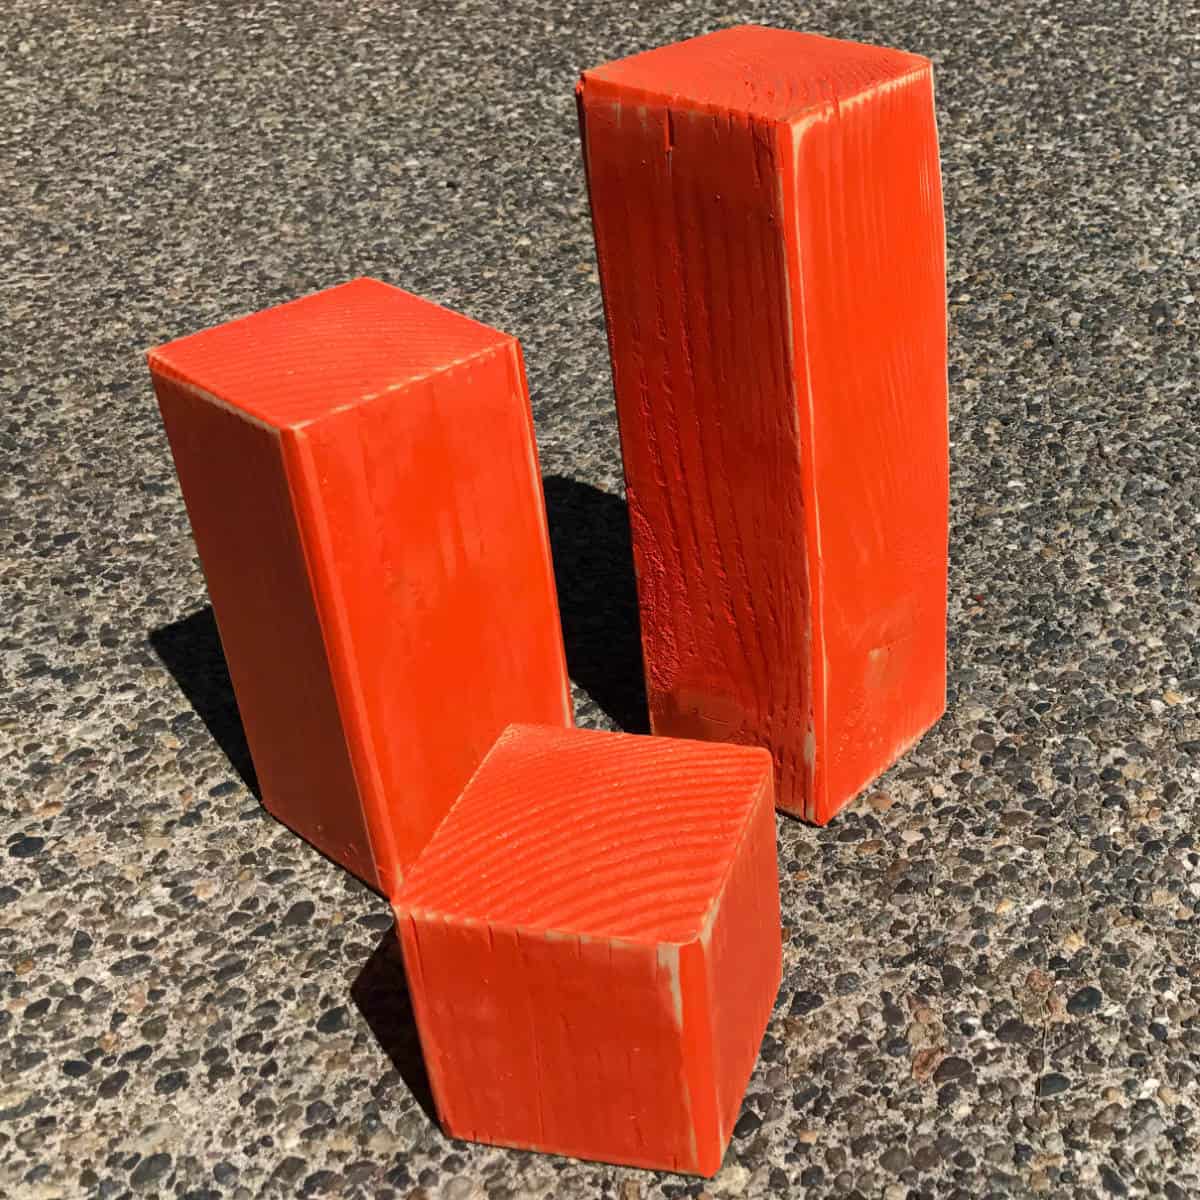
Step 3: Paint your sanded blocks.
We had exterior orange paint on hand and painted just one coat. After the paint was dry, I sanded the edges a bit for a rustic look. You could also add a bit of homemade tea stain to the sanded areas to make your pumpkins look even more rustic. If you don’t want the rustic look, you may want to use a primer first since the paint soaks into the wood.
At this point, I asked my teenagers if these orange blocks looked like pumpkins and got an emphatic “NO, they look like orange blocks!”
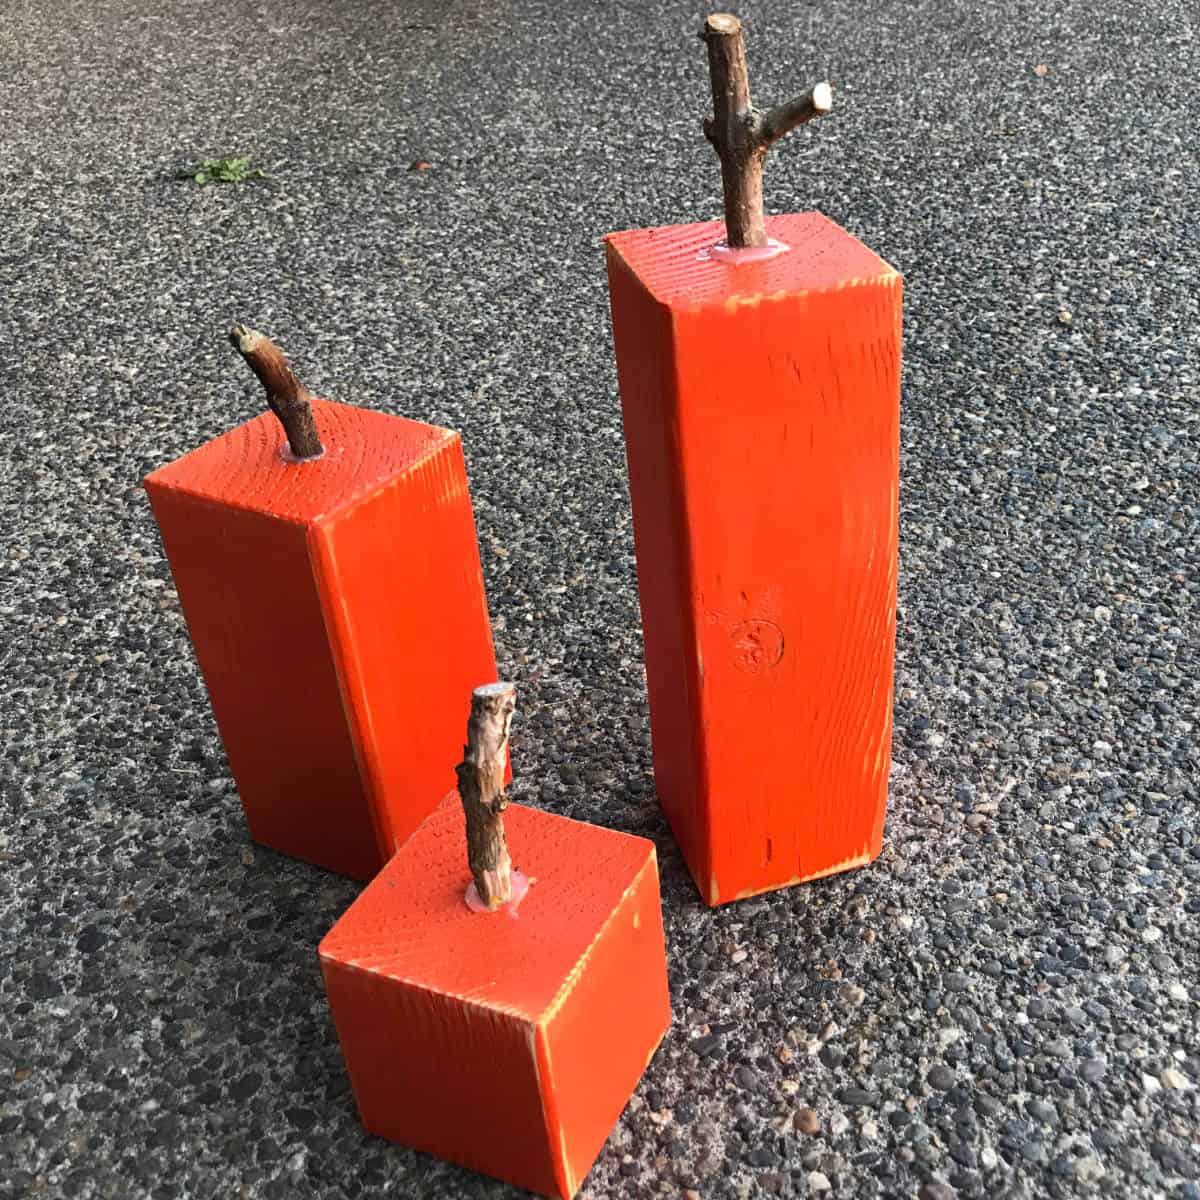
Step 4: Attach pumpkin stems.
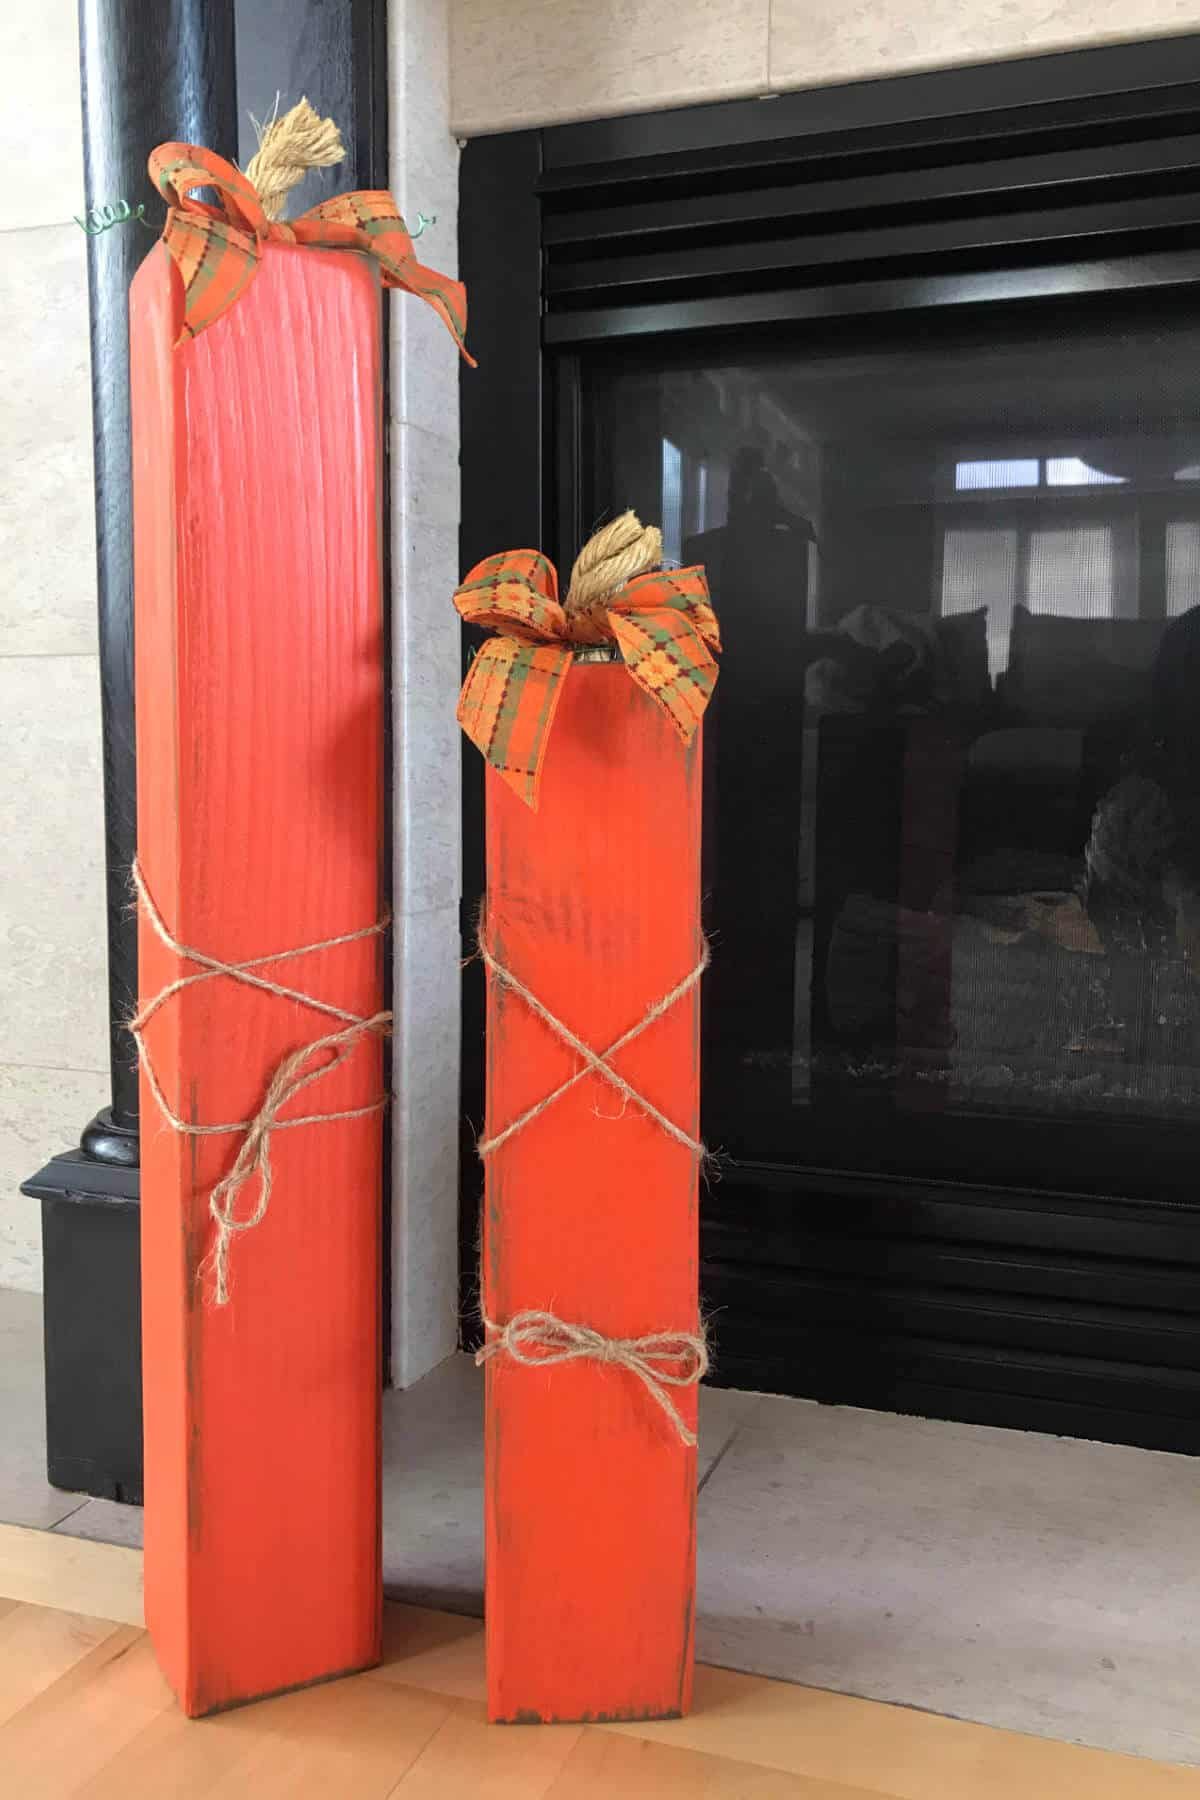
I used sticks from my yard and glued them on using a glue gun. It would also work well to use rope like I did on my 4 X 4 Firecrackers or you could use 3/4″ dowel rods wrapped in jute (shown below).
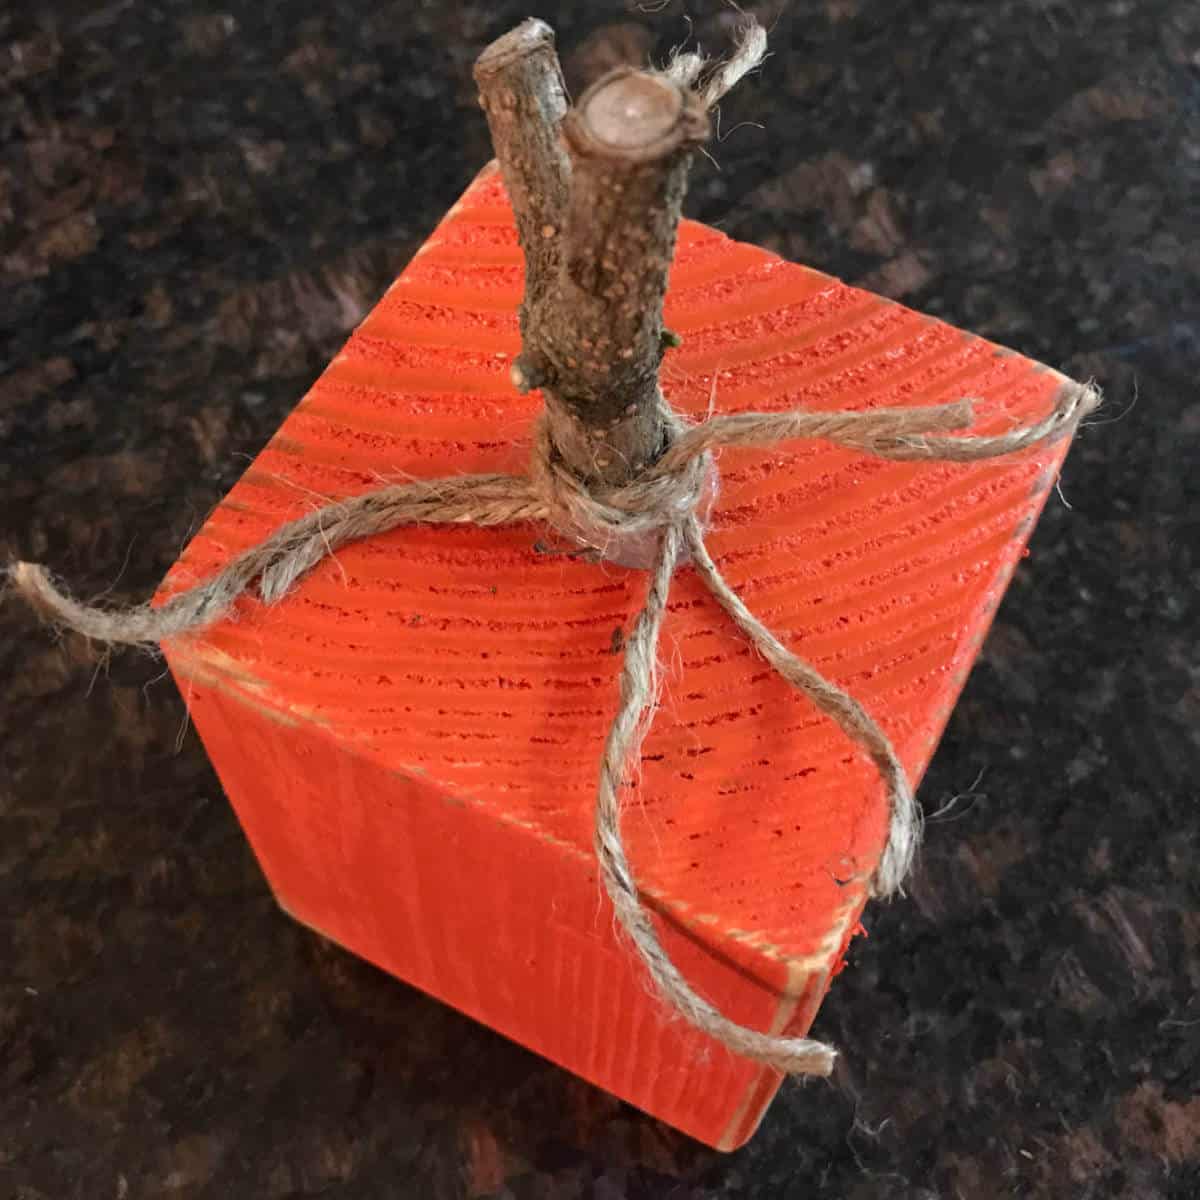
Step 5: Attach jute.
Cut four pieces of jute and tie them around the pumpkin stem. Then, fray the jute to give it a nice, full look.
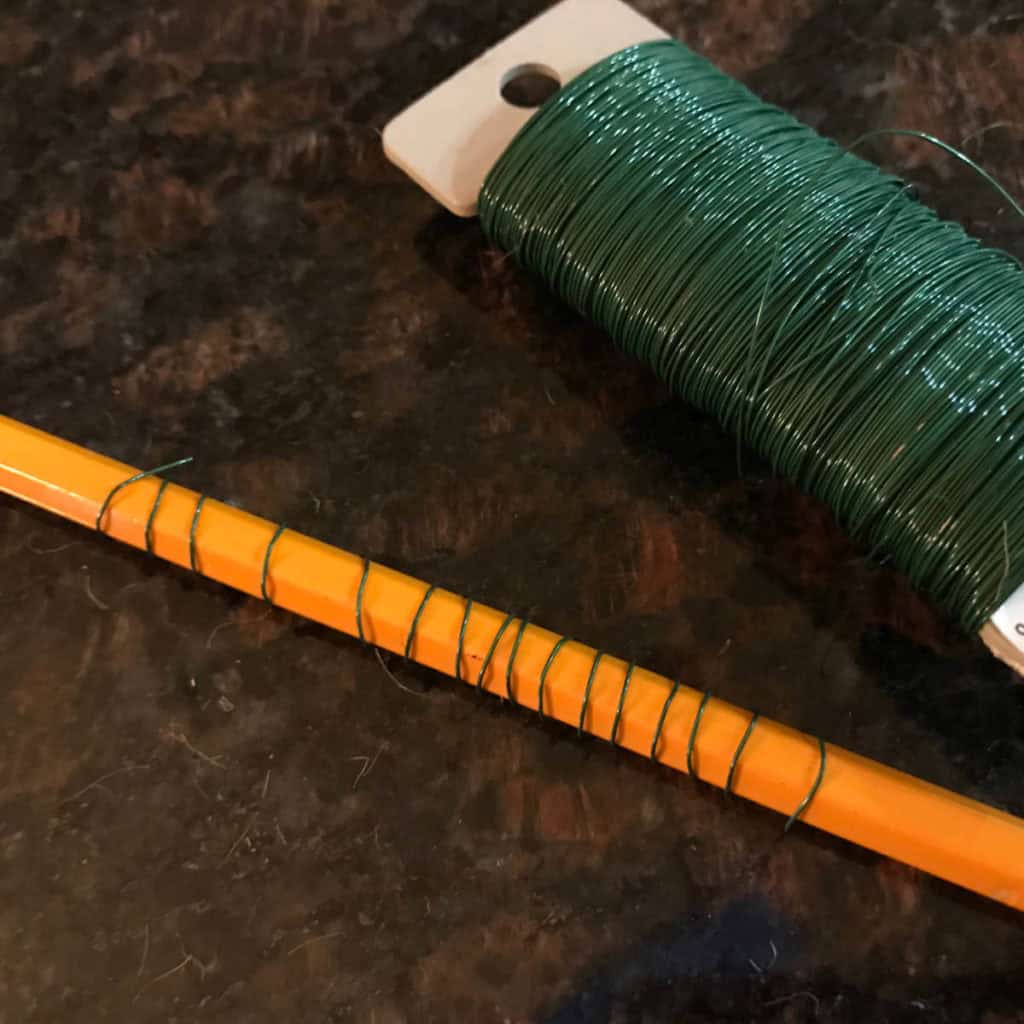
Step 6: Create tendrils.
Wrap green wire around a pencil to make pumpkin tendrils. I used florist’s wire but I would use thicker wire next time.
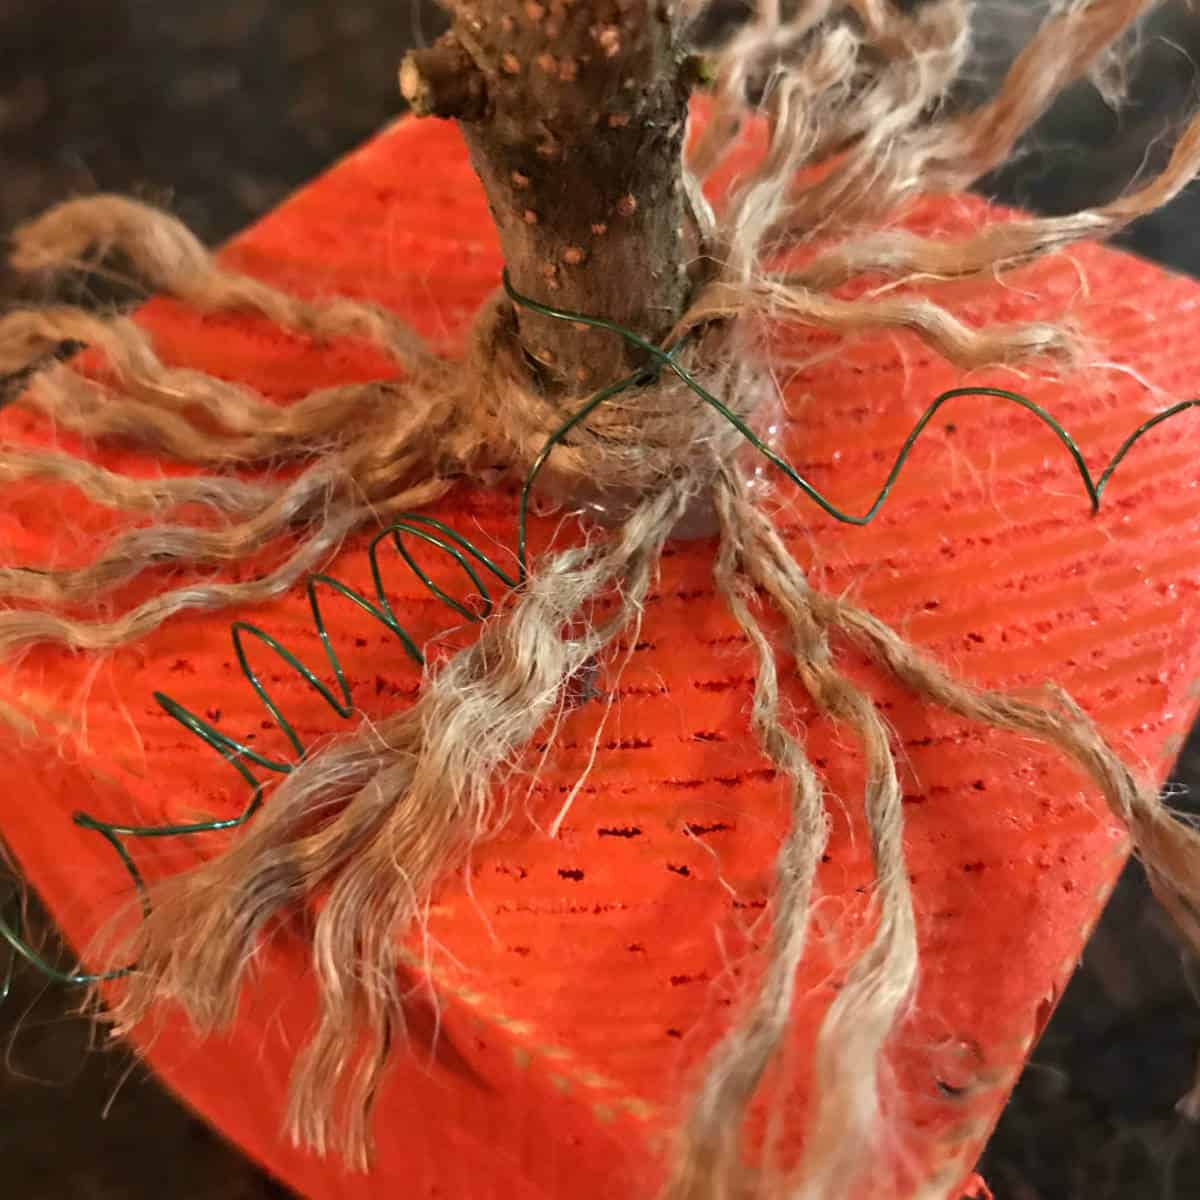
Step 7: Wrap the curled green wire around the pumpkin stem.
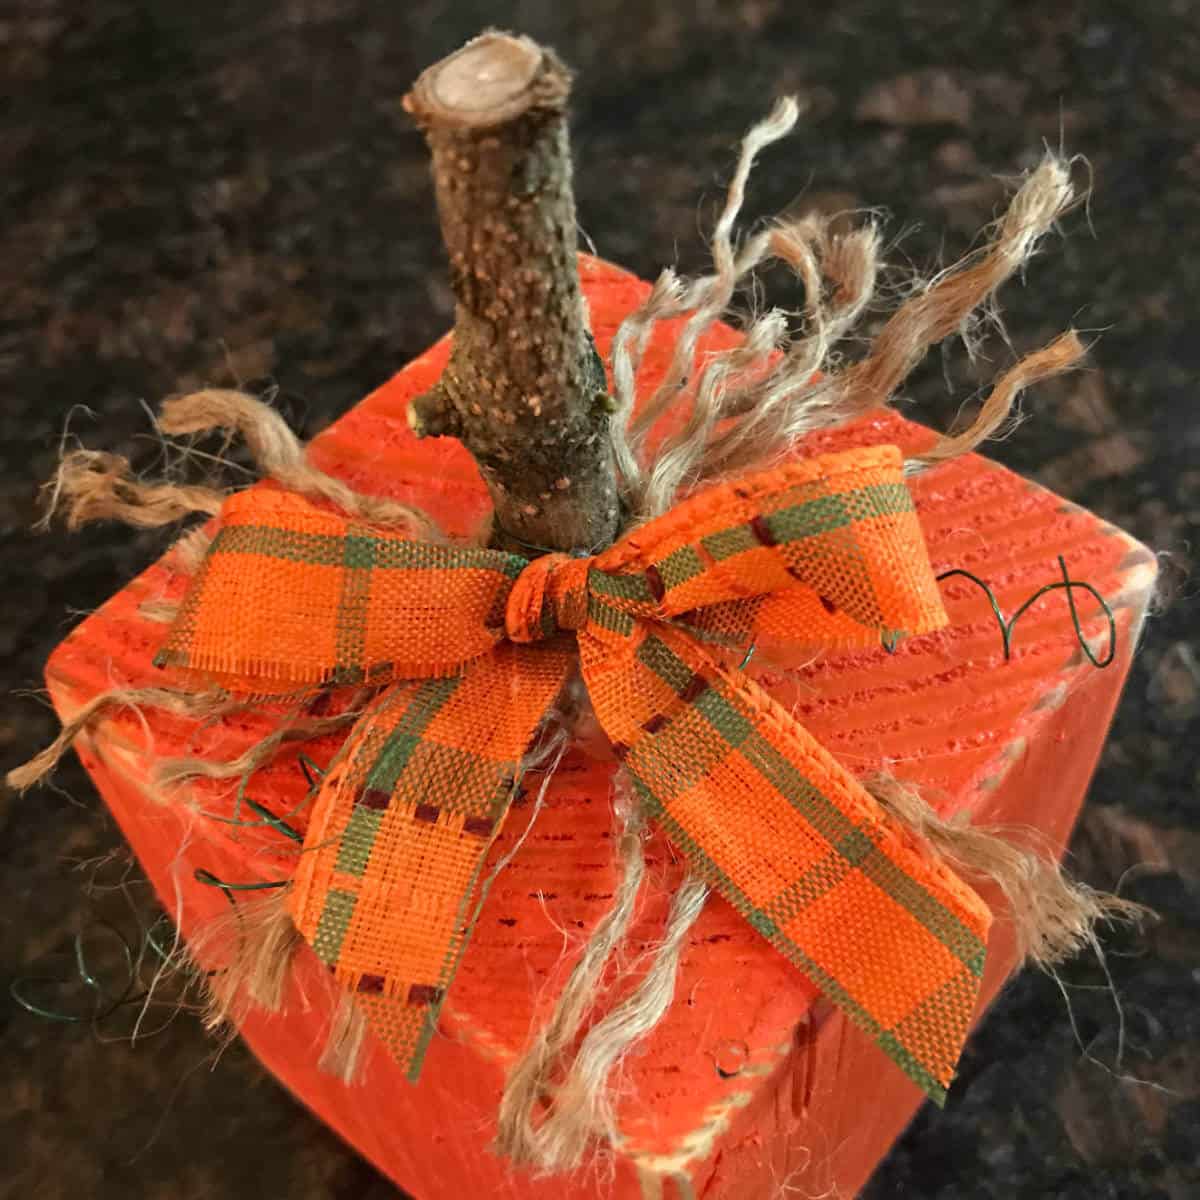
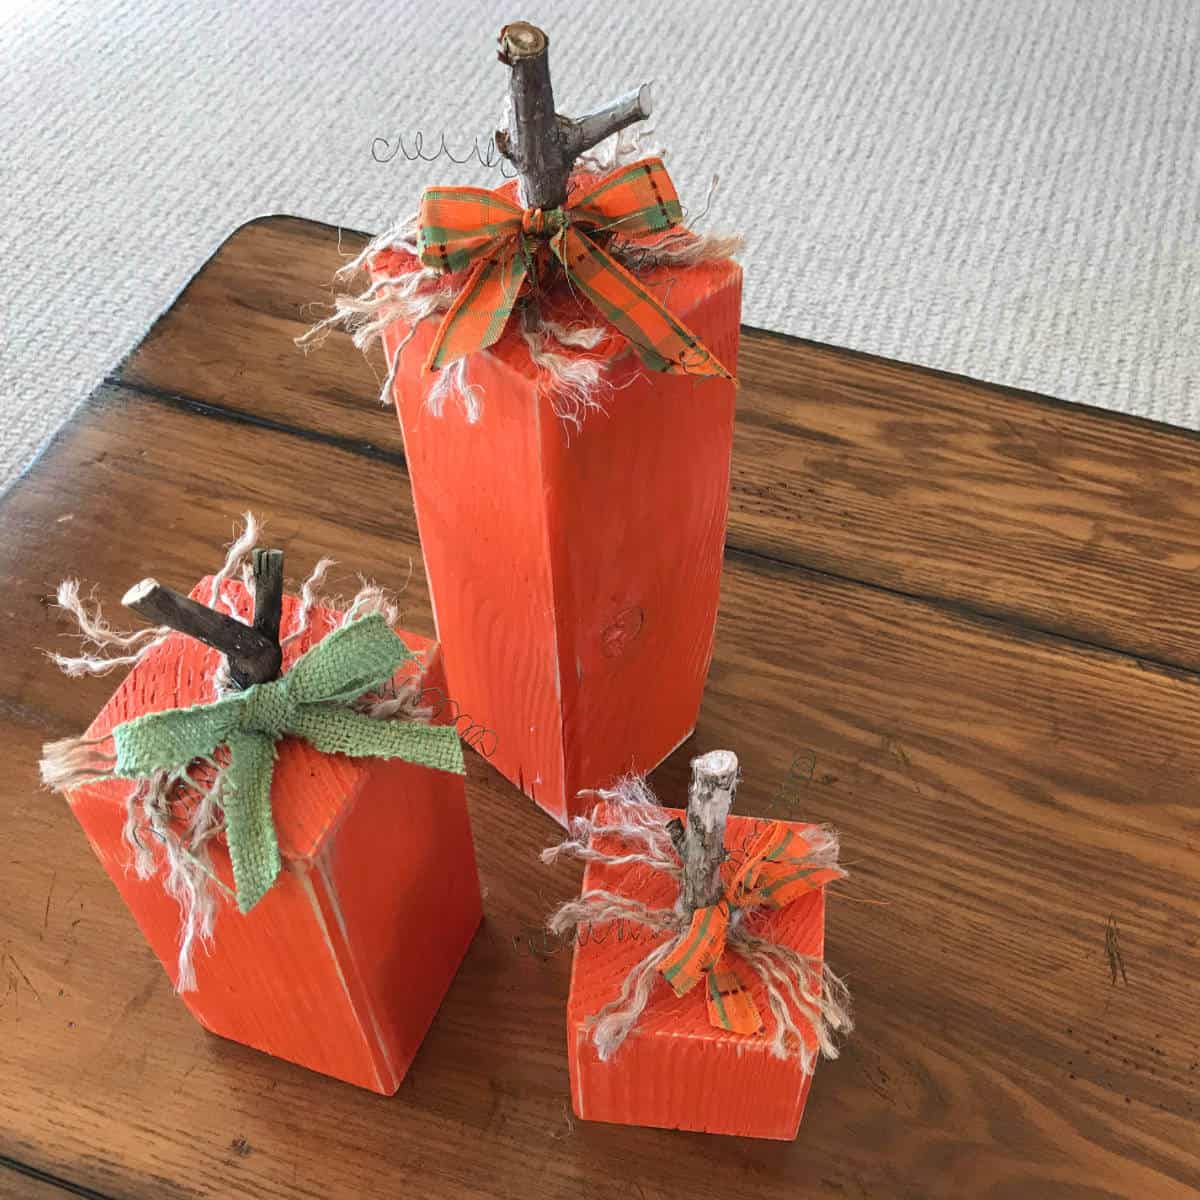
Step 8: Hot glue a festive bow to the stem.
Step 9: Enjoy your new fall decor!
Once I completed these pumpkins, my son ran upstairs, glanced at the pumpkins, and gasped in shock, “they actually do look like pumpkins!”
How To Get Creative With 4X4 Wood Pumpkins
There are many different ways you can make these 4 x 4 pumpkins uniquely yours! Recently, I helped my 5-year-old and 2-year-old great niece and nephew create pumpkins for their porch. They love to paint and craft!
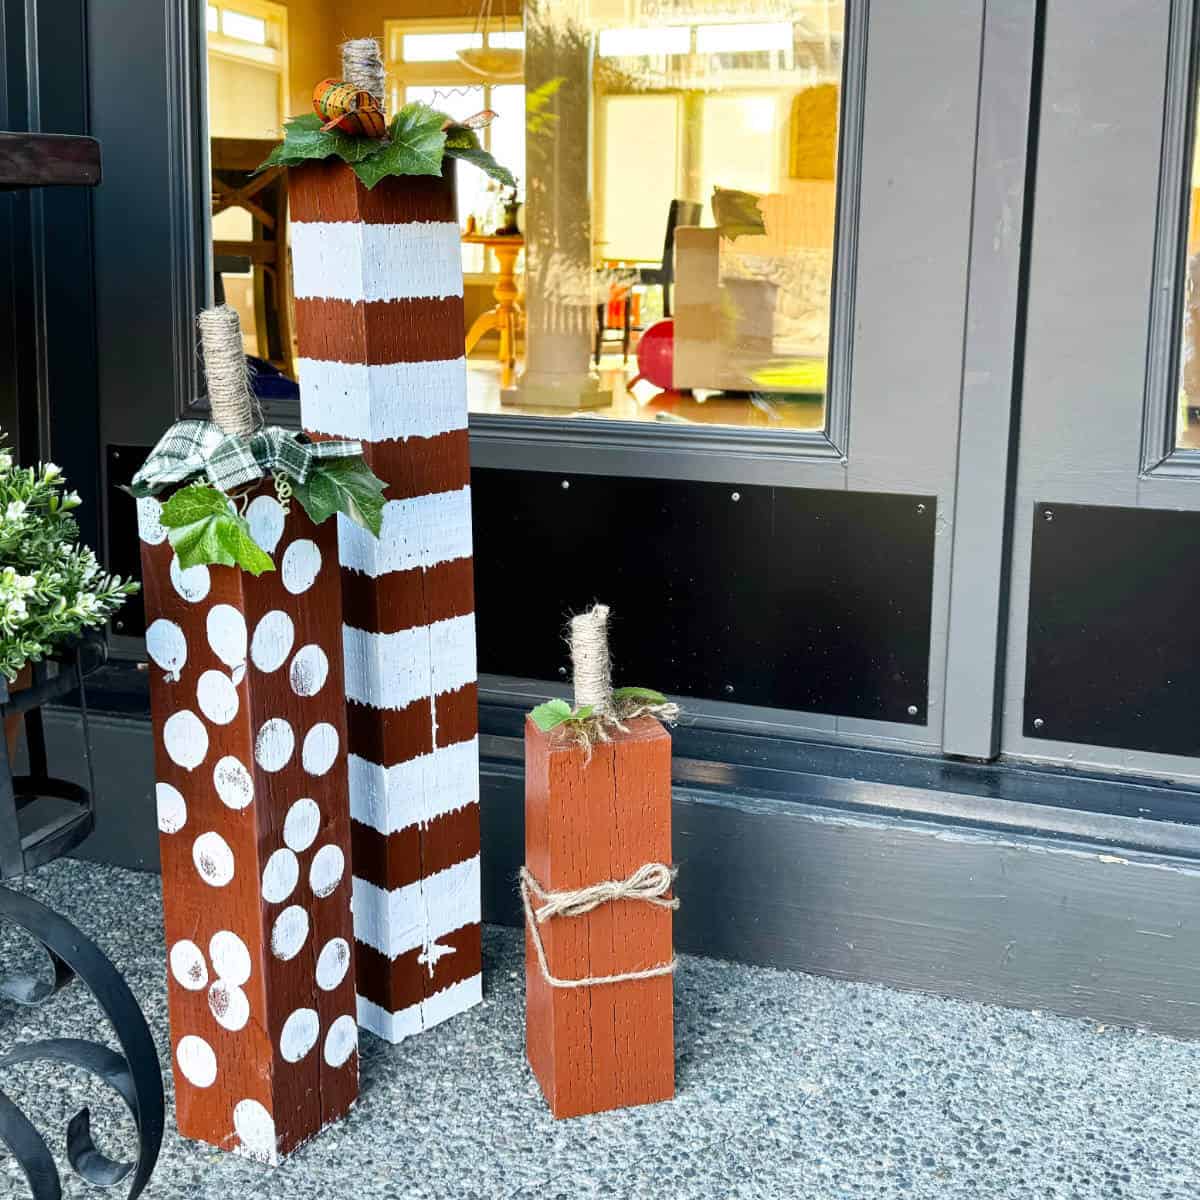
- Make Them Tall – Tall pumpkins are great for your front porch!
- Paint Patterns – Paint one pumpkin with polka dots and paint stripes on another for a unique look! My great niece used a spouncer to paint polka dots and we used tape to paint stripes. We didn’t try to make them perfect because the idea was a project that was easy to make with a rustic look.
- Paint A Surprising Color – For a more modern look, you may want to paint the pumpkins white or make them sparkle!
- Add Faces – You could paint faces on your 4×4 pumpkins or use your cutting machine to add vinyl eyes and a mouth.
- Use Chalkboard Paint – Use chalkboard paint instead of orange so you can write messages or draw different faces that can be changed throughout the season.
- Add Buttons – Glue on buttons to create polka dots and a fun textured look.
- Create A Pumpkin Family – Create a set of pumpkins with each family member’s name on them and display them on the mantel.
- Use Festive Material – Instead of ribbon, use fabric scraps to add texture and variety or create a patchwork effect with different fabrics.
- Use Fake Pumpkin Leaves – I happened to have fake pumpkin leaves left from another project and they worked perfectly on these pumpkins.
What to Do With 4×4 Pumpkins
There are many creative ways to use and display 4X4 wood pumpkins! Here are a few ideas:
- Porch Display – Arrange a group of 4×4 pumpkins on your front porch along with mums and hay bales.
- Table Centerpiece – Use a group of three 4×4 pumpkins as a centerpiece for your dining or coffee table or create a DIY Pumpkin Planter.
- Mantel Decor – Place a few 4×4 pumpkins on your fireplace mantel.
- Gift Idea – Gift your 4×4 pumpkins to help friends or family welcome fall! A small 4 x 4 pumpkin works great in a Fall Care Package.
- Seasonal Shelf Display – Place a couple of pumpkins on open shelves or bookcases to bring a touch of fall into the room.
- Fall Photo Props – Use these 4×4 pumpkins as props in family photo shoots or at fall parties along with this Printable Candy Corn Banner.
- Wedding Decor – If you’re planning a fall wedding, use these pumpkins as part of your decor, to decorate tables, or as placeholders with guests’ names painted on them.
- Classroom or Office Decor – Share a bit of fall in your classroom or office by displaying your pumpkins on desks, shelves, or windowsills.
- Craft Fair or Market Sales – Sell your 4×4 pumpkins at craft fairs or local markets.
- Craft Party – Host a fall craft party and provide the supplies for guests to create their own 4×4 pumpkins.
These 4 X 4 Pumpkins ended up being quite the thrifty fall project simply because we had a lot of the supplies on hand! They have brightened our home and porch and satisfied my desire for fall decorations! I’ve also gifted these pumpkins in Fall Care Packages along with Fall Popcorn Tags added to microwave popcorn!
Frequently Asked Questions
You can cut the heights of the pumpkins to your preference. Common sizes are 4″, 8″, and 12″ for a varied look. However, you could also make extra tall pumpkins for your porch or to sit by the fireplace!
I used an outdoor paint I had on hand from painting wooden rocking chairs that sit on our deck. If you plan to use your pumpkins outdoors, I would use outdoor paint. If your 4 x 4 pumpkins will only be indoors, you could get away with using acrylic paint. I also like to use Behr paint samples from Home Depot. They are a great size for projects like this!
If you plan to sand parts of your pumpkins to give them a bit of a rustic look, it would be beneficial to use a sealant on them for outdoor use.
I used a hot glue gun for the stem. If you are attaching a wood stem, you could also use wood glue. If you are using rope for your stem, hot glue works well.
Over the years I have also found if you drill a hole a half inch deep in the top, the rope or twig will stay put better. You can do this with a wood spade bit.

More Fall Ideas
- DIY Pumpkin Planter: A Step-By-Step Guide For Fall Decor
- How To Make Sweater Pumpkins
- How To Make 4 X 4 Pumpkins
- How to Make Homemade Pumpkin Puree
- Fall Word Search
- Fall Crossword Puzzle
- Fall Word Challenge
- Free Fall Coloring Pages
- Printable Fall Activity Sheet
- Cozy Fall Microwave Popcorn Tag
- Fall Care Package Printables

Hi! I’m Bridget!
I create printables and DIYs to help you get organized and celebrate special occasions! It’s my mission to inspire you to get creative and find joy in every day!