How To Make A Quilt Out Of Dog Bandanas
Wondering what to do with the bandanas you’ve collected from the groomer? Check out how to make a quilt out of dog bandanas.
Your dog comes home from the groomer looking spiffy and sweet in their new bandana, but it doesn’t last long before man’s best friend wants that bandana off. You throw it in the wash and then tuck it in a drawer. A few years go by, and you wonder what you should do with all those perfect fabric triangles.
I have a solution for you! You can use them to make a quilt that will make you smile whenever you look at it.
When my daughter was getting ready for college and getting her dorm room essentials together, she knew she would miss her TeddiBear and decided to make a quilt out of all his bandanas to take to college with her.
I am not a professional seamstress, but I’m not afraid to learn how to make something useful with my sewing machine. This is one of those instances where my daughter and I (mostly my daughter) created a masterpiece with minimal sewing experience. If we can do it, so can you!
If you’ve never sewn before, you might want to start with a project like this Flax Seed Heating Bag that’s super easy to make!
1) Wash the bandanas you have from the groomer and iron them.
If you haven’t already washed the bandanas, this is a good time to do it. It’s important to wash the material so it doesn’t shrink and pull when you wash your quilt later.
2) Decide how big you’d like to make your quilt.
Determining how you will use the quilt is always a good idea so you don’t end up with one that only works as a lap blanket when you want a quilt for your queen-size bed. When looking for quilt size recommendations, note the difference between the mattress size and the recommended quilt size.
We planned to make a twin-size quilt so Justine could use it on her bed in her college dorm room.
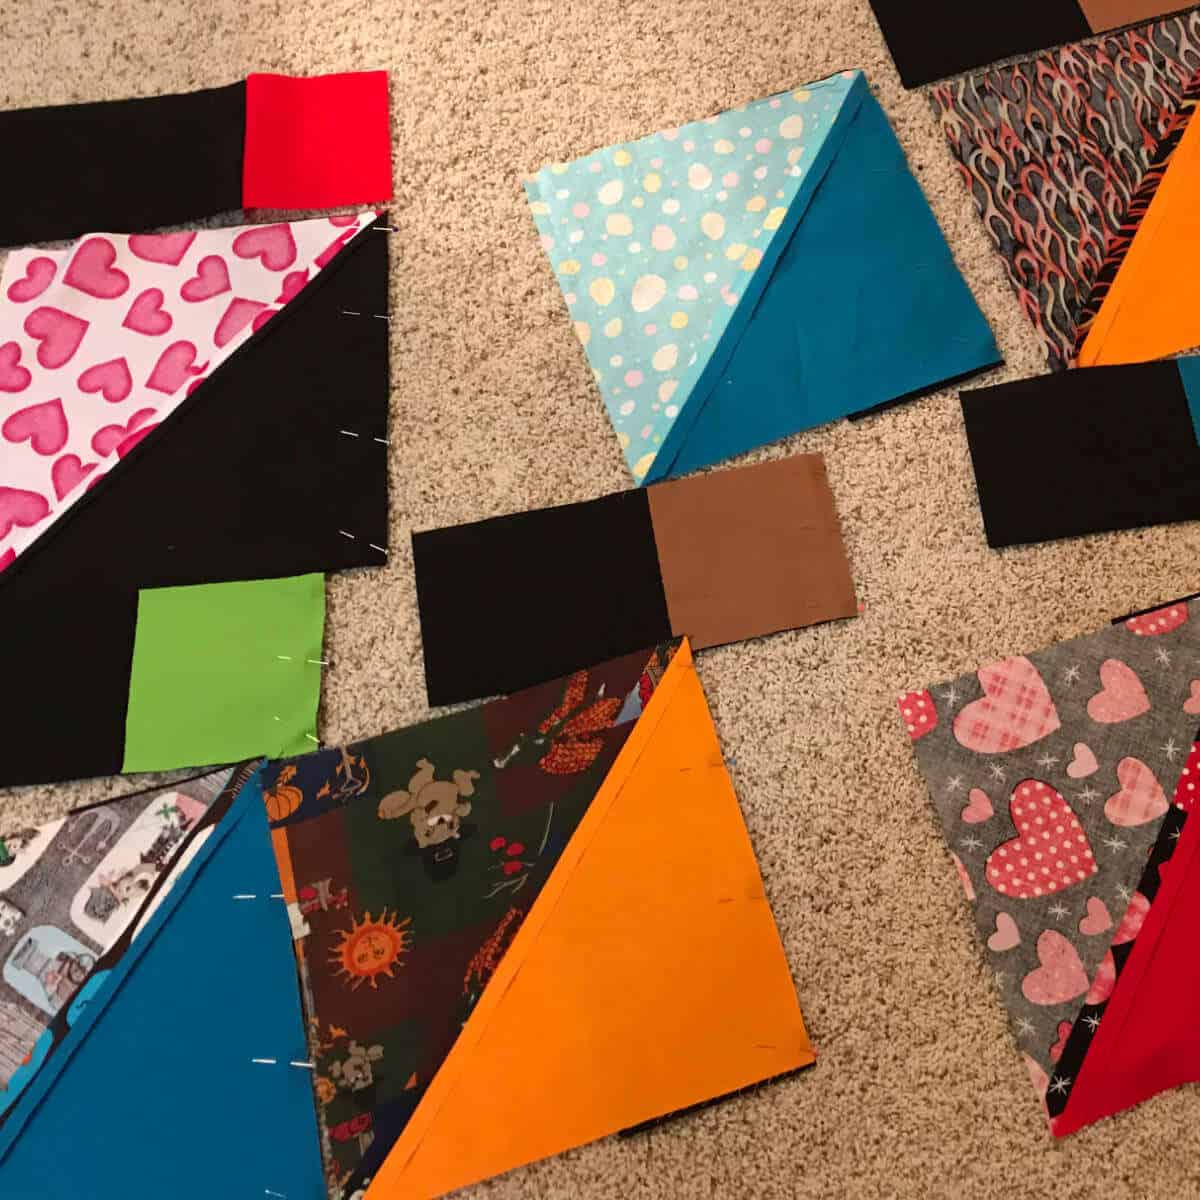
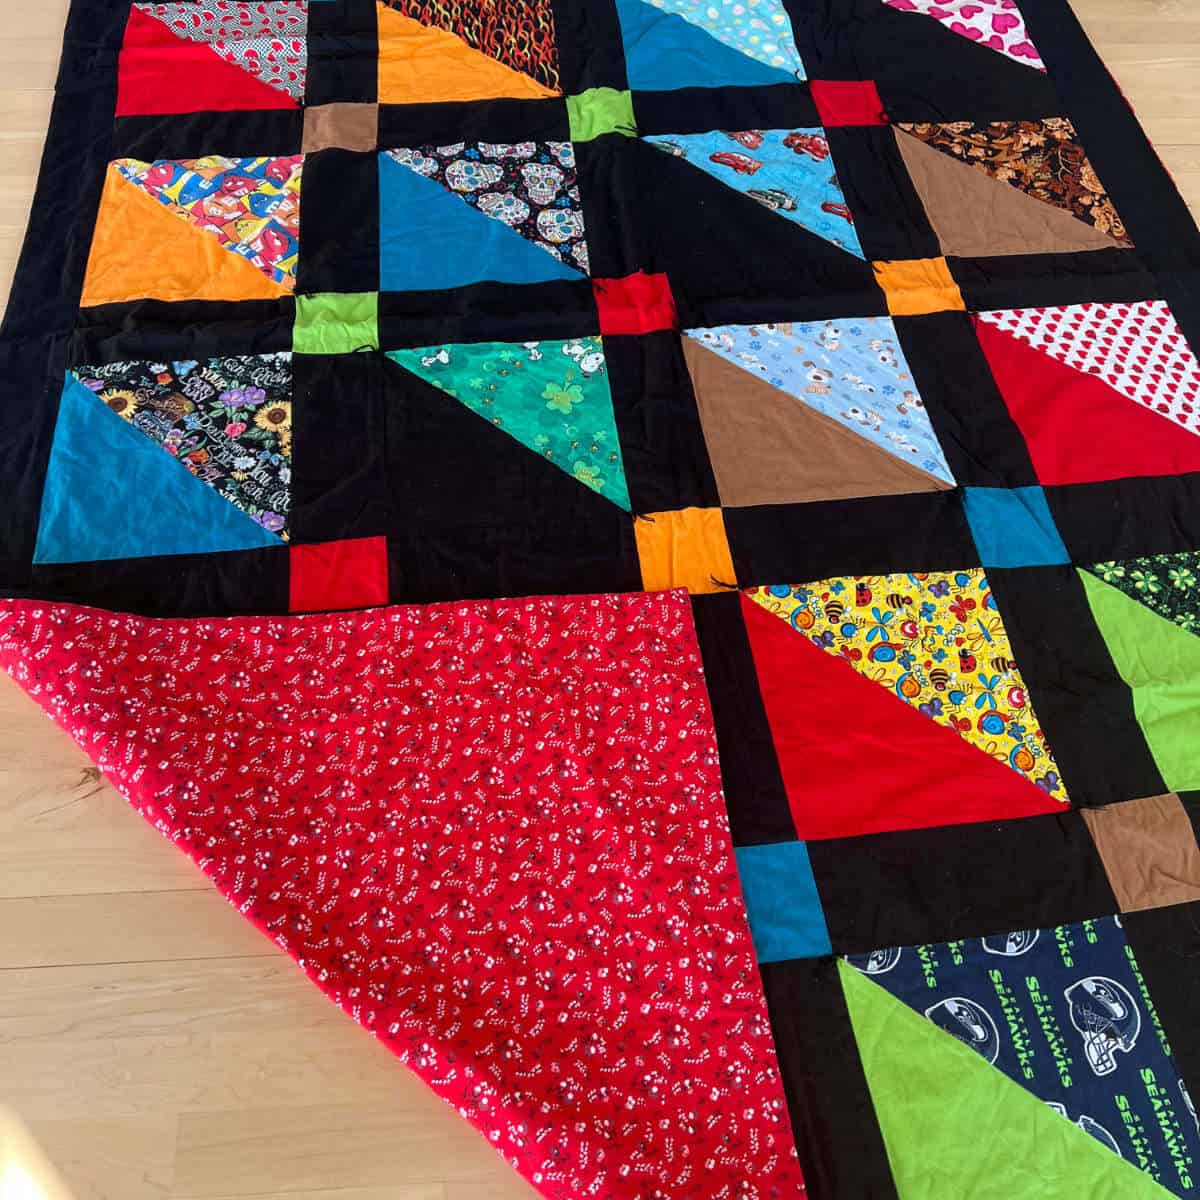
3) Spread the bandanas out on the floor to create a design.
Let your inner artist come out and decide how you’d like your quilt to look. Do you want to intersperse colors throughout the quilt, create a pattern, or color block?
You might want to lay them out, let them sit for a day, and then revisit them.
4) Determine what additional fabric and supplies you will need.
Don’t have enough bandanas for the quilt size you want to make? No worries! You can purchase coordinating fabric to make your quilt the size you need.
We used a coordinating color to go with each bandana. You may not need to do a coordinating color if you have more bandanas than we did.
This post contains affiliate links. When you purchase through an affiliate link, we receive a small commission at no additional cost to you. Disclosure.
Along with a sewing machine, scissors, and a rotary sewing cutting set, here are supplies you may need:
- Additional Coordinating Fabric
- Backing Fabric
- Batting
- Thread
- Embroidery Thread (in a coordinating color)
5) Gather your supplies.
Now that you know what you need, it’s time to shop.
6) Decide what size your bandana squares will be.
Depending on the size of your dog, the bandanas you get from your groomer may be different than the ones we had. Our TeddiBear was a medium-sized dog, and it worked great to have 11 x 11 squares. With a 1/2″ seam, we ended up with 10 x 10 finished squares.
7) Cut coordinating fabric squares.
Be sure to wash, dry, and iron your coordinating colors before you cut them into the size of squares you plan to make. A rotary cutting set makes cutting squares easier and more accurate.
8) Cut your coordinating fabric squares into triangles.
Once you’ve cut your coordinating fabric squares, it’s time to cut the squares into triangles so you can use them with the bandanas.
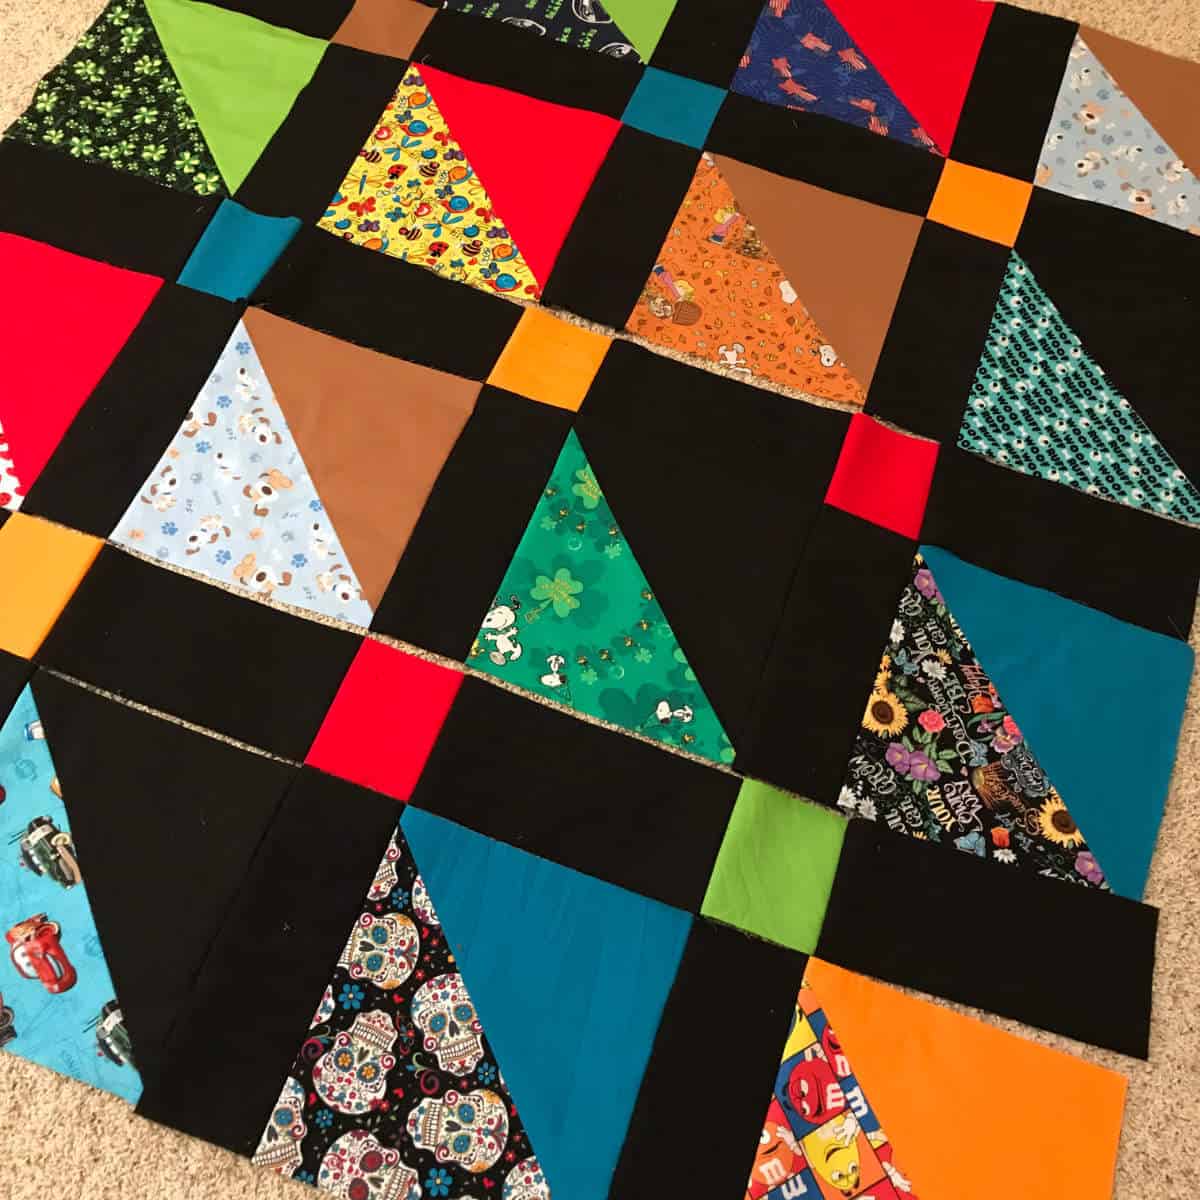
9) Lay out the coordinating triangles with the bandanas they go with.
Now it’s time to add your coordinating colors to the quilt design that you have laid out on the floor. This is where you get to be creative.
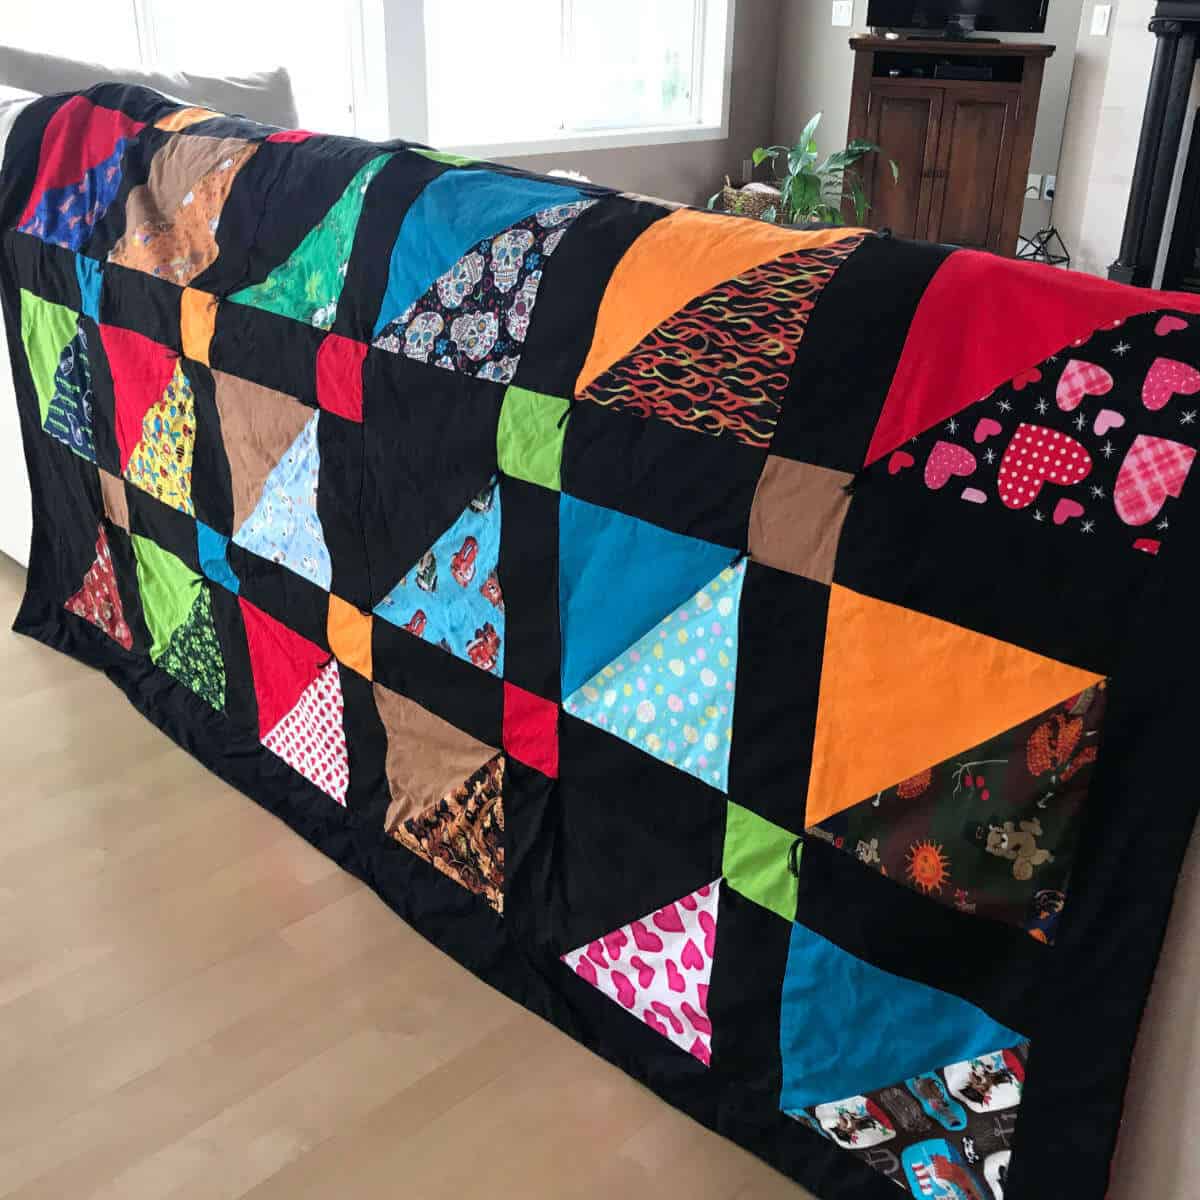
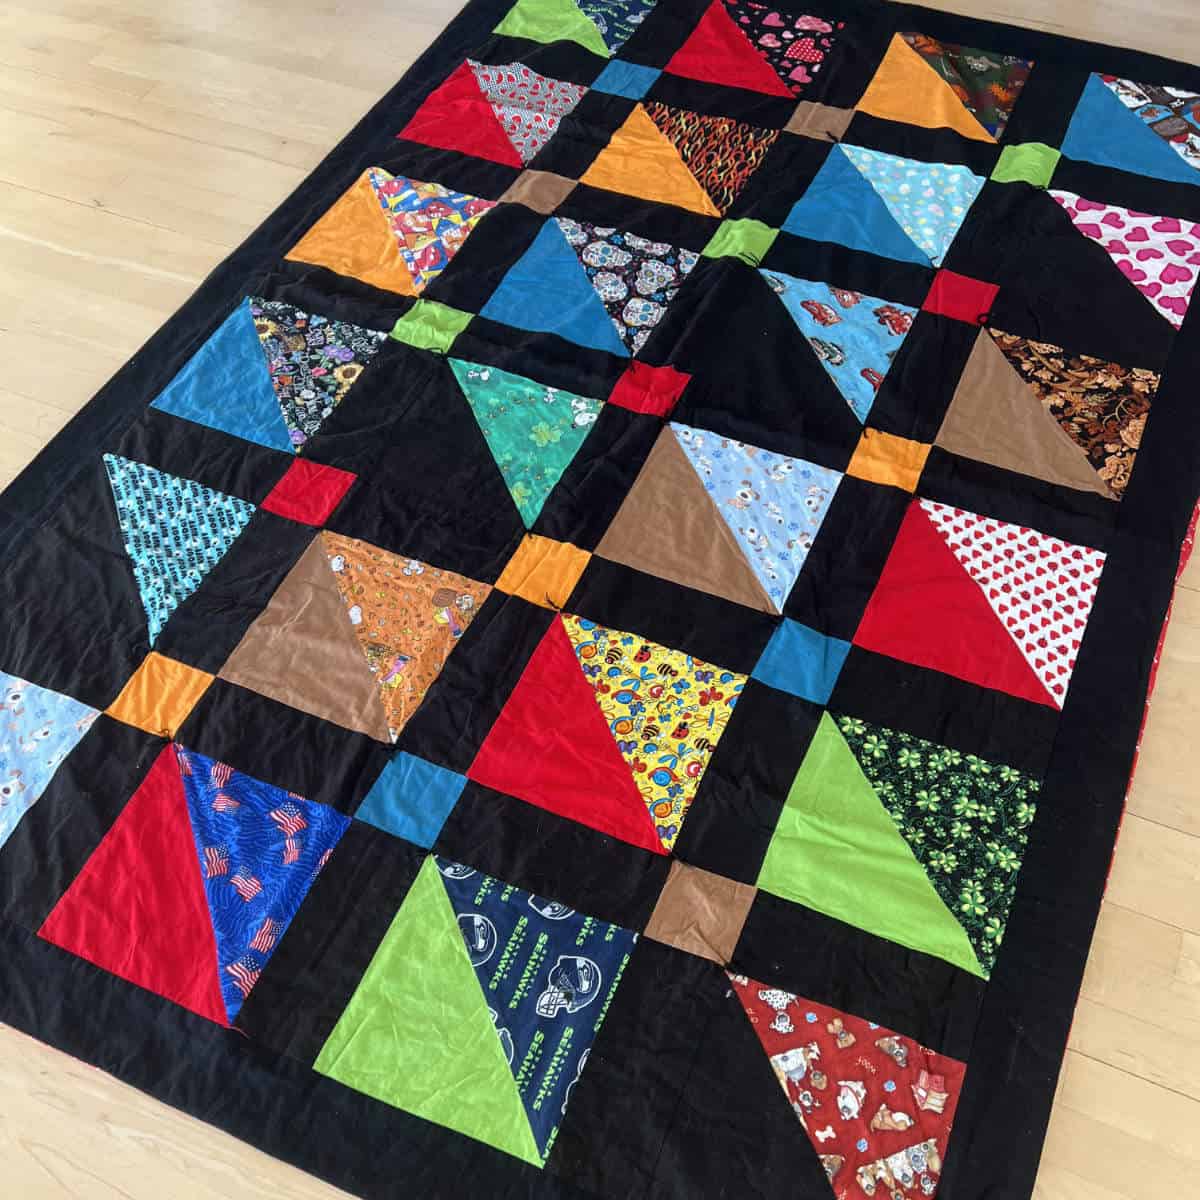
We chose to place each coordinating triangle color on the diagonal. For example, the orange triangles are placed diagonally on the quilt, then blue triangles, black, brown, red, and green. You can see this below.
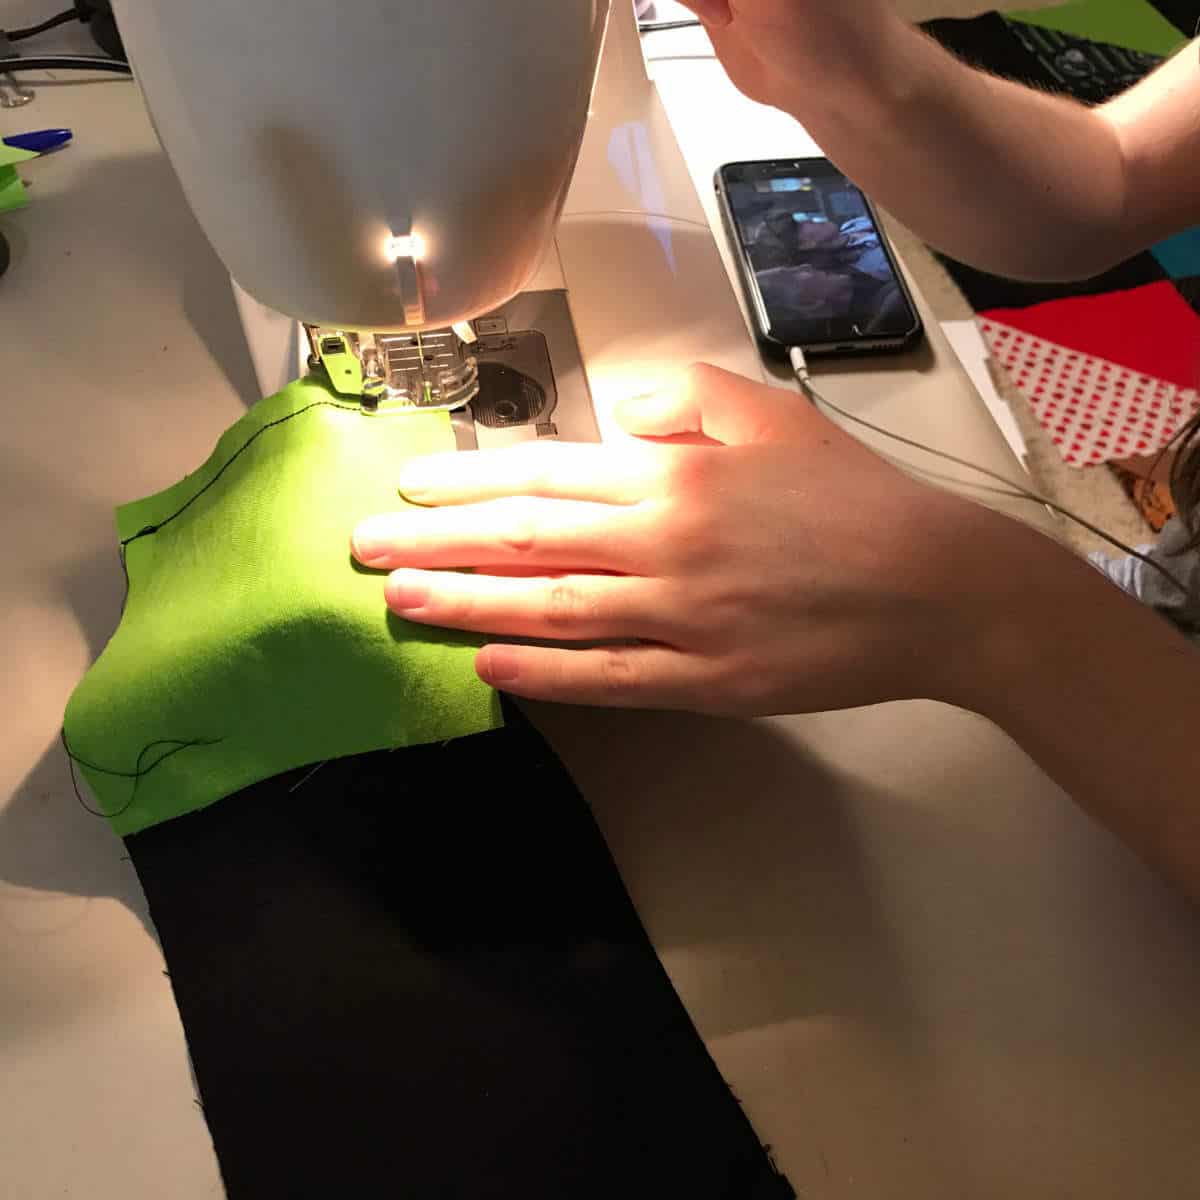
10) Pin and sew your triangles together and press the seams.
With your quilt design on the floor, you can start sewing the triangles together, one at a time. Because you don’t want to mess up your design and have to do it all over again, I recommend pinning and sewing one square at a time.
Once one square is sewn, lay it back on the floor before moving on to the next square.
Then, when all of your triangles are sewn together, you can go back and iron the seams flat, one square at a time, using the same method of putting the square back in its place before moving on to the next.
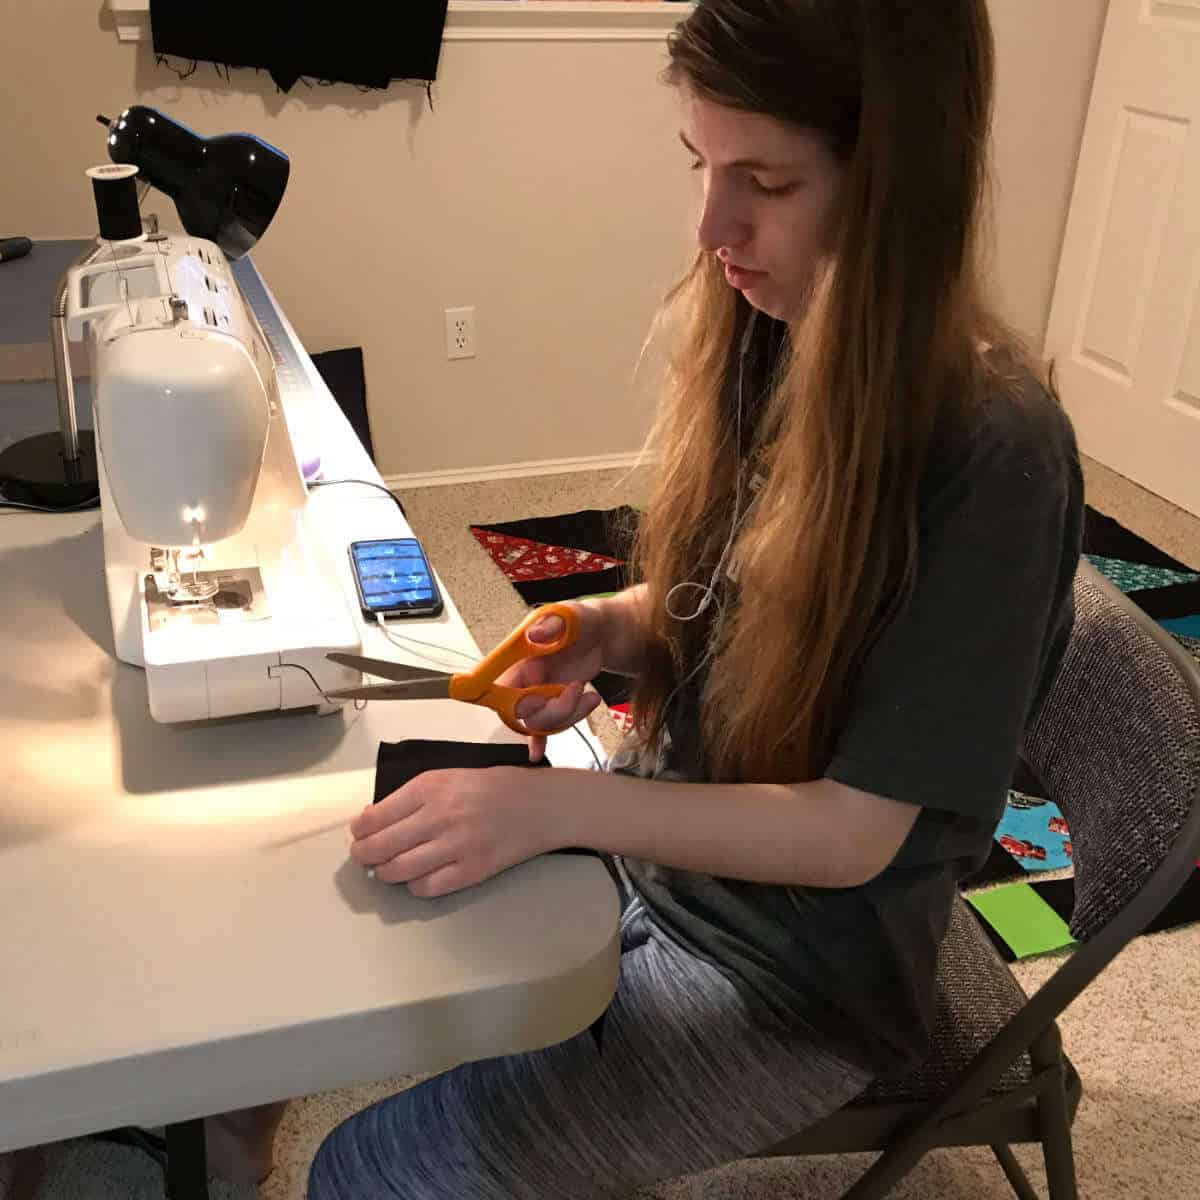
11) Cut the squares you just sewed to be uniform in size.
Now that all your triangles are sewn into squares, and the seams are pressed open, take them one by one to your cutting mat and trim them into your pre-determined square size. Depending on how accurately the groomer cut the triangles, they may already be just the right size. Likely, you will need to do a bit of trimming.
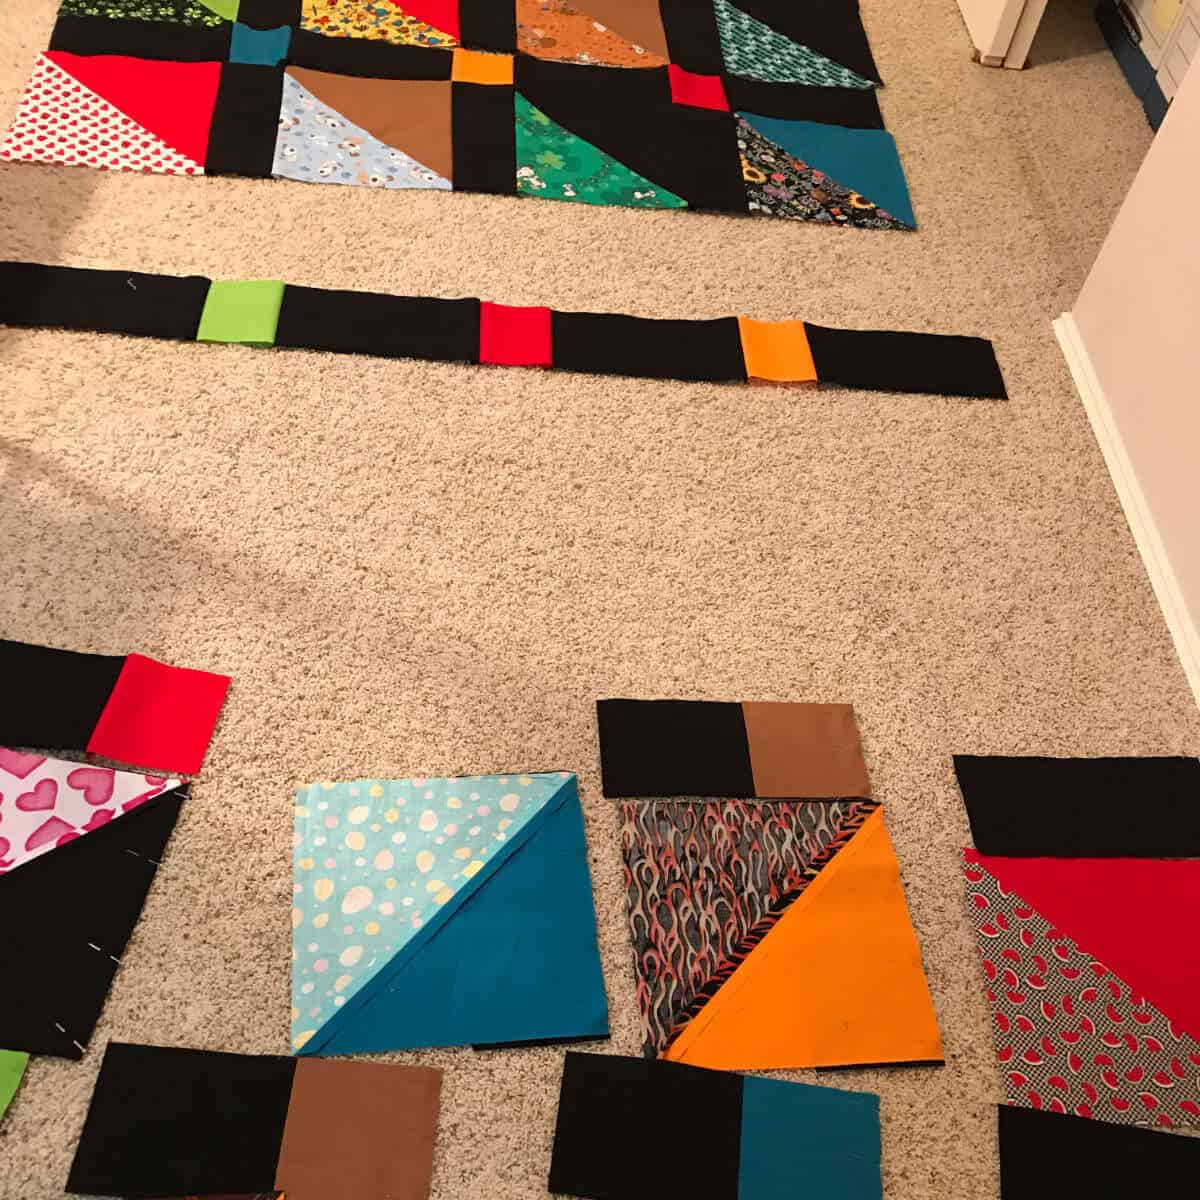
12) Cut coordinating material to place between your squares.
Since your squares are now ready, it is time to get the exact measurement of the squares so you can cut your in-between pieces. The size of your in-between pieces will be determined by the overall size you want your quilt to be.
We used 5″ x 11″ strips for a finished 4″ x 10″ with a 1/2″ seam allowance. We used these vertically between each square and horizontally at the bottom of each square.
Then, we chose to use color-coordinated squares in between the filler strips. Those squares were 5″ x 5″ for a finished 4″ x 4″ square.
13) Start at the top and sew your first row together, pinning as you go.
After placing your quilt top pieces, pin the first square to the filler piece and sew. Then, move to your next square, pin, and sew. Repeat this process until your first row is complete.
Once the row is complete, press open the seams with an iron.
14) Sew your second filler row together.
Next, you’ll move to your filler row of strips and squares, using the same process.
15) Pin and sew your first and second rows together.
Once the filler row is complete, carefully pin the first row to the filler row lining up the seam lines. Then sew the two rows together and press the seam open.
16) Repeat until all of your rows are sewn together.
Repeat this process until your quilt top is complete, minus the border.
I suggest laying your quilt out each time you finish a seam to ensure you keep the design the way you intended it to be.
17) Measure the top and bottom of your quilt and cut a border.
Make sure that the material you choose as a border will be long enough to line each side of your quilt top. If not, you can sew a few pieces together to get the needed length.
18) Pin and sew the top and bottom borders to the quilt.
The top and bottom borders will be the width of the quilt. Be sure to press the seam after sewing.
19) Measure and cut the sides of your quilt and cut border pieces.
Now that the top and bottom borders are attached, you can measure the length of each side and cut the side pieces.
20) Pin and sew the side borders onto the quilt.
Then, sew the side borders onto the quilt and press. The top of your quilt is now complete!
21) Place your backing fabric over your finished quilt top, good side down.
If your backing fabric isn’t as big as the quilt top, you may need to sew two pieces together to get the right size. Then, place the good sides together of the quilt top and backing.
22) Next, place your batting on top of the wrong side of the backing fabric.
This may seem strange, but turning your quilt will leave the batting inside the quilt, right where you want it.
23) Pin and sew around the edges, leaving an opening for turning.
Now that you have all three pieces together pin around the edges and sew, leaving an opening for turning.
Many professional quilters will do a binding around their quilts. I have chosen to keep it simple with this method.
24) Turn your quilt right side out.
Once your quilt top, backing, and batting are sewn together, you can turn it right side out. Use scissors to poke out the corners for a nice crisp look.
25) Finish the opening.
Turn in your opening and press with an iron. Then, you can hand sew the opening, so it isn’t visible or run a narrow seam to close it off.
We hand-sewed our opening, so you can’t tell where we turned our quilt.
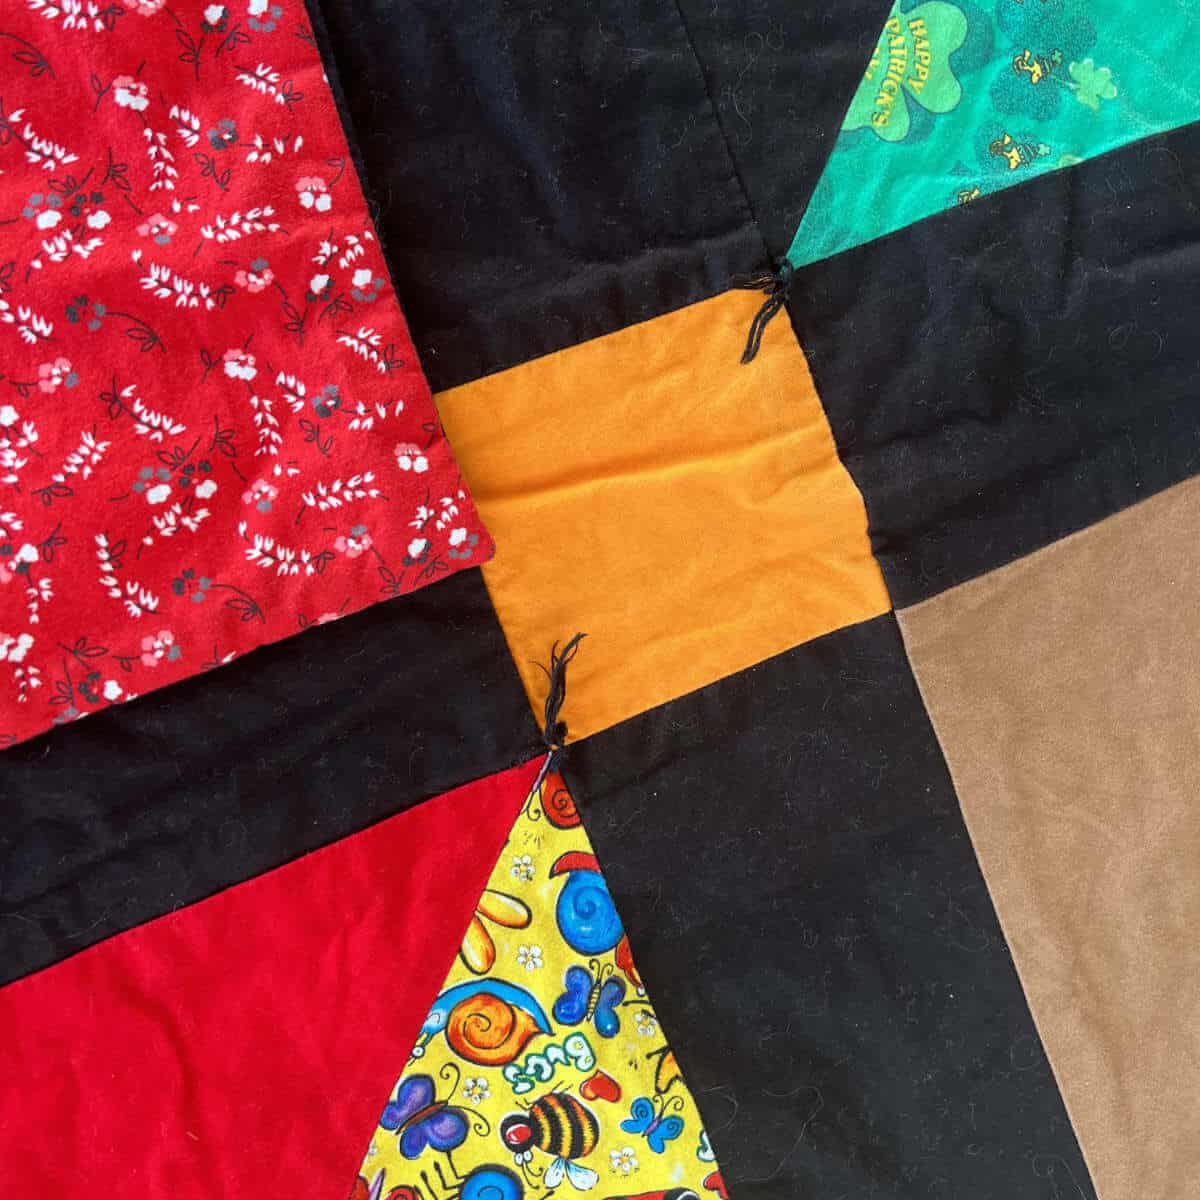
26) Add ties at the corners.
Use embroidery thread to attach all three pieces in various spots of the quilt. This makes it so you can’t pull up the top of the quilt independently from the other two layers and keeps everything nicely aligned.
We used black embroidery thread on two corners of each small color block.
27) Enjoy your bandana quilt!
This is a quilt you can be proud of and will be a great memory of your furbaby when you aren’t near them.
TeddiBear is no longer with us, but this quilt is a constant reminder of the love he brought to our lives while he was here!